Let’s take your nail art to the next level: Stand out from the norm and make a bold statement.
That’s where these 15 basic baddie nails ideas come in.
Each look provides the perfect balance of sass and sophistication.
You’ll instantly radiate attitude and confidence simply by wearing any one of these designs.

Best of all, many are quite simple to recreate at home so you don’t need to be a nail pro to pull them off.
Snake Scales – A textured look with oval acrylic scales painted on the nails in a reptilian pattern
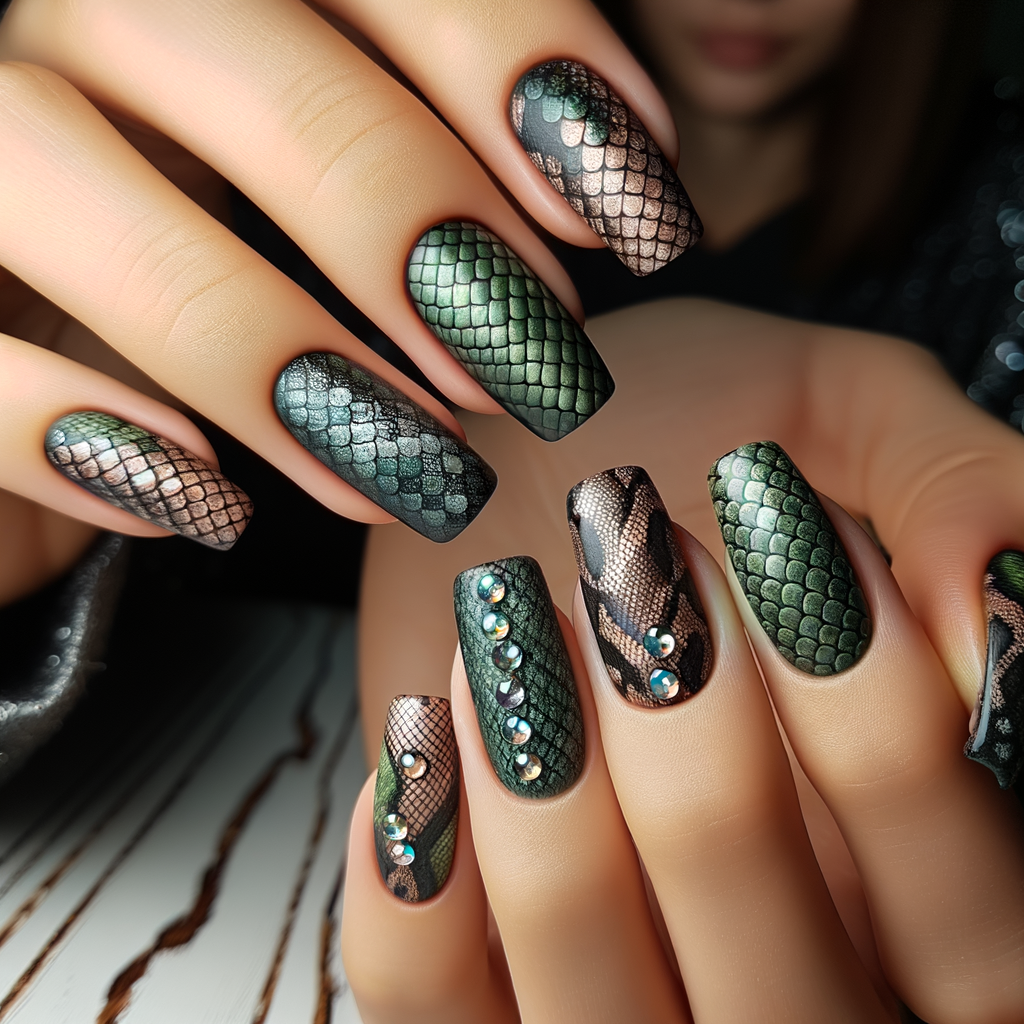
Snake Scales is the perfect manicure for anyone wanting to channel their inner reptile.
This edgy look involves painting oval
acrylic scales across the nail
in an overlapping pattern similar to a snake’s skin.
For the best effect, start with short almond shaped nails filed into a subtle wedge.
Then apply a taupe, olive or emerald green crème polish as your base color.
These earthy shades help the scales really pop.
Once the base coat is dry, take a small brush and a darker polish shade matched to your base.
Carefully paint on small oval scales, starting from the tip and working your way down towards the cuticle in rows that overlap like shingles on a roof.
Vary the size of each scale slightly for realism.
Add extra dimensionality by highlighting the tops of random scales with an even lighter gray or tan.
You can also accent some scales with a touch of gold shimmer if you want some extra glam factor.
Once all nails are finished with their scaly coating, seal with a high-gloss topcoat.
The shine helps bring out the textured detail.
A few extra scales added across the knuckles ties the look together.
Wear these snake nails with pride – they’re the perfect animalistic accessory and sure to turn heads.
Just be warned they may cause some people to fear for their safety!
Chrome Coffins – Elongated coffin shaped tips with a shiny chrome gold or silver metallic finish
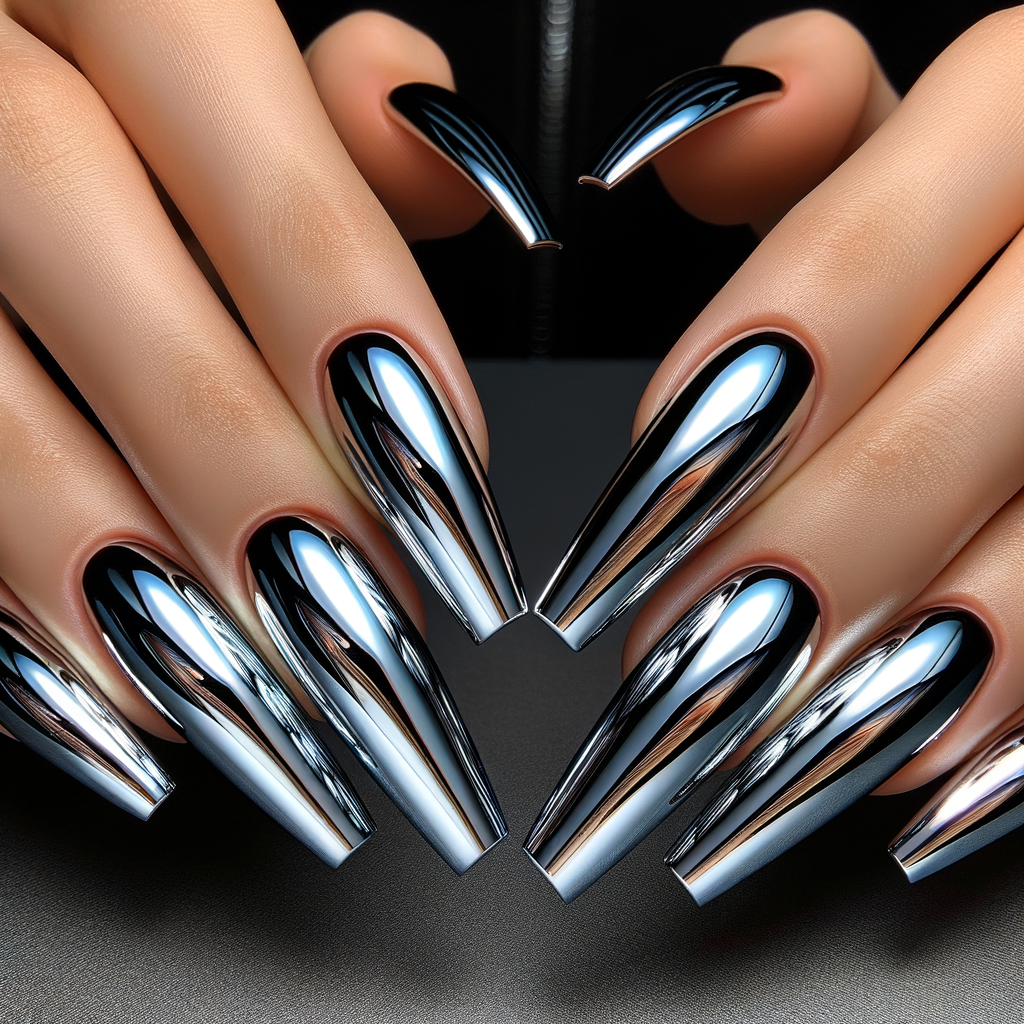
The Chrome Coffins is a showstopper design that is simply edgy elegance defined.
This look involves achieving an elongated coffin shaped tip using acrylic overlays.
The key is opting for a super shiny metallic finish.
Start with well-filed natural nails in a tapered coffin shape, rounding off the tips slightly.
Then apply a layer of clear acrylic liquid to the free edge of each nail.
Next, dip a small brush into acrylic powder and dot it onto the liquid, building up the nails into sharp points.
Gently file the tips into perfectly smooth elongated curves.
For the chrome effect, apply a base coat of shiny black creme polish.
This will make any light colored polish really pop later.
Next, brush on two thin coats of chrome gold or silver pigment polish.
These have ultrafine glitter that delivers an almost mirror-like mirror shine.
Apply sparse thin layers, allowing drying time between.
Once chrome coats are fully dry, apply a high-gloss quick dry topcoat.
This seals and intensifies the reflective finish.
Admire your new claws!
The eye-catching shine of these coffins will demand respect and admiration.
They exude elegant yet dangerous vibes.
Pair with dark clothes and lots of attitude.
These are nails meant to draw stares wherever you roam.
Just be sure not to poke anyone’s eyes out with your lethal long tips!
Glitter Gems – Short rounded nails dotted with small clear gems in varied glitter shades

The Glitter Gems manicure is perfect for those who want to channel their inner rock star but with a touch of delicate femininity.
This look involves topping short, rounded nails with various sizes of clear faceted gems in an assortment of glittering shades.
Start with short, rounded nails filed into smooth ovals.
Apply a thin coat of white creme polish to act as the ” adhesive” for the gems.
Let it fully dry.
Then take a small zirconium cutter and gently push it through an assortment of hexagonal or round glittering gems in colors like gold, silver, rose gold, multicolored and more.
Have the gems spaced out on your work surface.
Next, use the tip of a dotting tool or small brush dipped in clear nail glue to pick up each gem one by one.
Gently place individual gems randomly around each nail in no particular pattern.
Add a few piled together for visual interest.
After all nails are studded, seal with a topcoat.
This locks the gems in place.
Admire how the multifaceted gems catch the light, creating a glittering rainbow effect on your nails.
They exemplify rock star razzle dazzle in a daintily charming way.
Pair with your best skirts and heels for a look that sparkles!
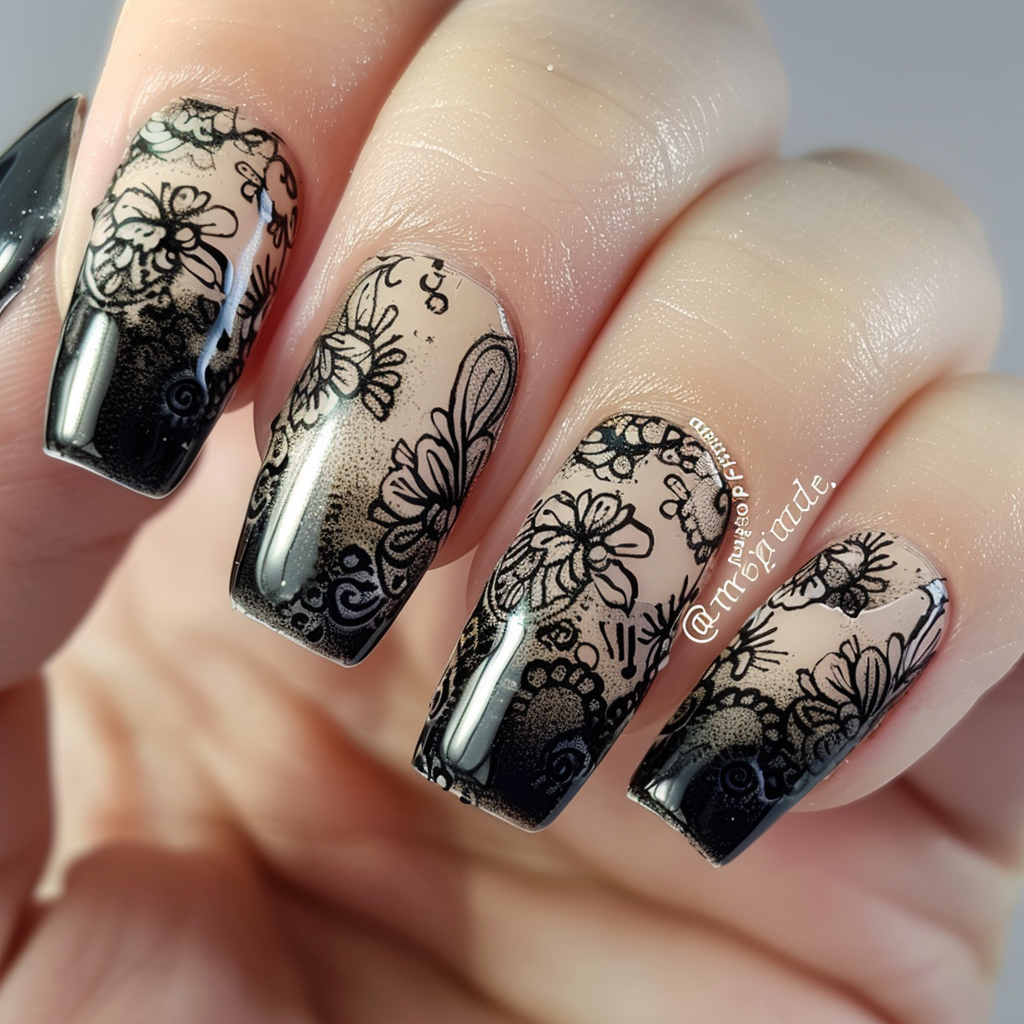
Dripping Black – A French manicure gone bad girl with black polish dripping down the tips

The Dripping Black manicure puts a gothic yet playful twist on the classic French tip.
This edgy look involves letting inky black polish “drip” artfully down the nail in randomized disheveled streaks.
Start with well-filed short almond shaped nails.
Apply two thin, even coats of a bright white creme polish to the lower half of each nail, forming a perfect French tip shape.
Once fully dry, load an angled brush with a glossy black polish and dot it messily along the white tips.
Let it drip and drag down the nail randomly, creating uneven drips and thick drips and thin drips.
For variation between nails, some can have short drips while others have trails stretching further down.
The imperfect drips give it a splattered, careless feel.
Before it fully dries, use a clean brush or small dotting tool to “feather out” the polish edges so the white and black blend together subtly.
Once fully dry, apply a glossy topcoat to preserve the messy look.
Admire how the black polishes emulate spills and splatters of ink on your fingertips – it’s edgy yet playful.
The Dripping Black nails look especially fitting paired with all black outfits or monochromatic fits.
Your nails will be the standout statement piece!
Splattered Neons – Bright neon polish splattered randomly across the nails for a carefree feel
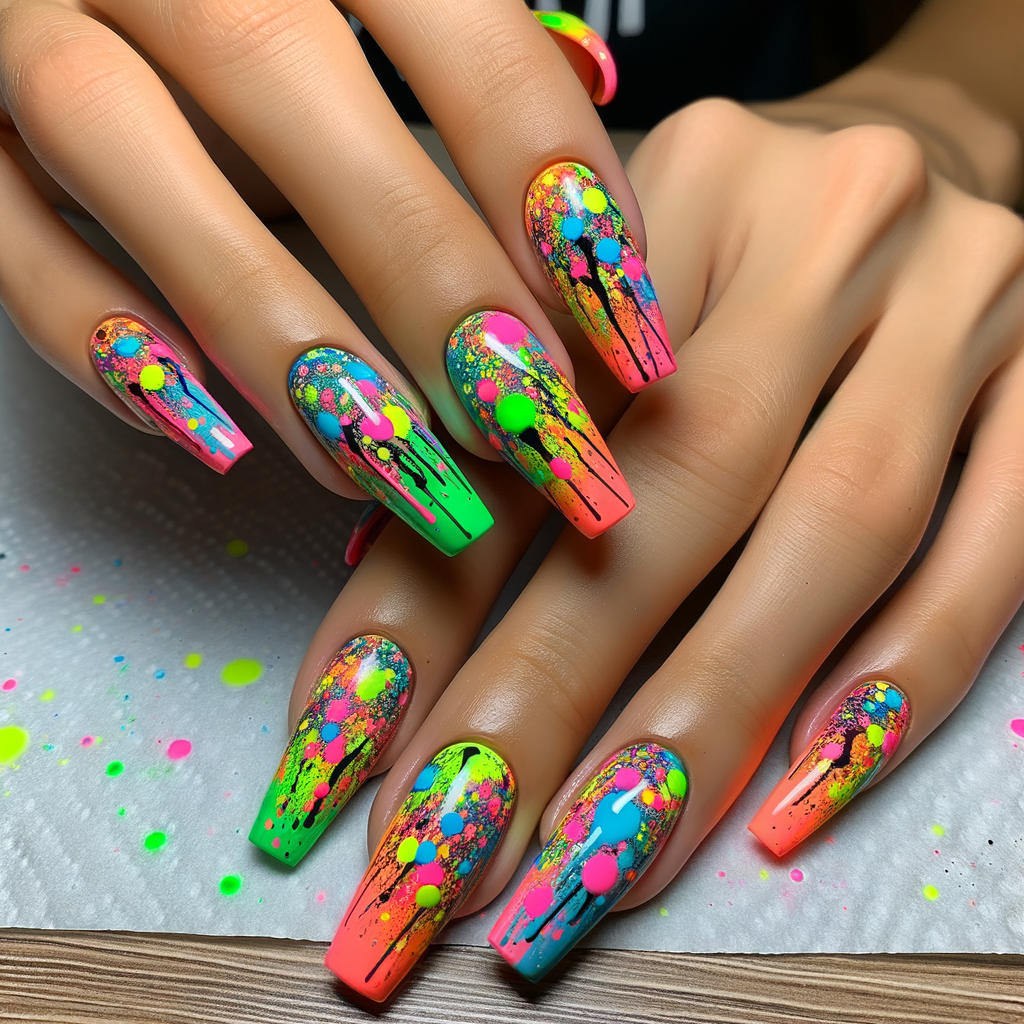
The Splattered Neons manicure is all about carefree self-expression through vibrant pops of color.
This design involves applying neon polish randomly across the nails in an effortless splatter effect.
Start with short almond shaped nails cleaned and buffed to a high shine.
Choose 3-4 neon shades like electric lime, tangerine, pink and blue.
Dip the tip of a dotting tool or small striping brush into one color polish and flick it randomly onto one nail.
Build up lighter and darker areas of color for dimension.
Repeat on the rest of the nails, switching colors each time so they all have a mix.
The polishes will likely bleed together which adds to the splattered effect.
For extra pizazz, add micro glitter or small crystals randomly between color layers once dried.
Before the final coat, use a clean brush dipped in acetone to slightly “feather out” where colors meet for softer edges.
Finish with a glossy topcoat to seal the vibrant polish.
Admire how your manicure exudes attitude with its unpredictable hues!
The Splattered Neon draw eyes for their joyful artistic styling.
Wear these nails when you want to brighten everyone’s day
.
Skulls & Crossbones – Tiny white skulls and crossbones water marbled across dark navy nails

The Skulls & Crossbones manicure puts an edgy spin on water marbling with its motif of tiny bones.
This look requires patience but results in nails that are creepy-cool.
Start with short, oval nails filed into smooth shapes.
Apply a thin coat of dark navy creme polish and allow to fully dry.
Next, fill a small container (shot glass works well) with room temperature water and slowly layer droplets of white polish across the surface until they begin connecting into linear designs.
Carefully submerge one nail tip flat under the water and slowly lift straight up.
The polish pattern will transfer giving a water marbled effect.
If skulls or crossbones shapes appear, great!
If not, try again until you achieve the right images.
Once pattern is set, seal with topcoat.
Repeat the water transfer process on the rest of the nails, sealing each one.
Some may turn out blank which adds an artistic variety.
Once all nails are finished, accent a few random ones by painting on mini skull and crossbones in opposite polish colors using a tiny brush.
Admire your spooky mani that is equal parts haunting and cool.
Perfect for walking on the dark side in style!
Sparkly Claws – A vampy look with stiletto tips painted in shimmering crimson and adorned with tiny gemstone accents
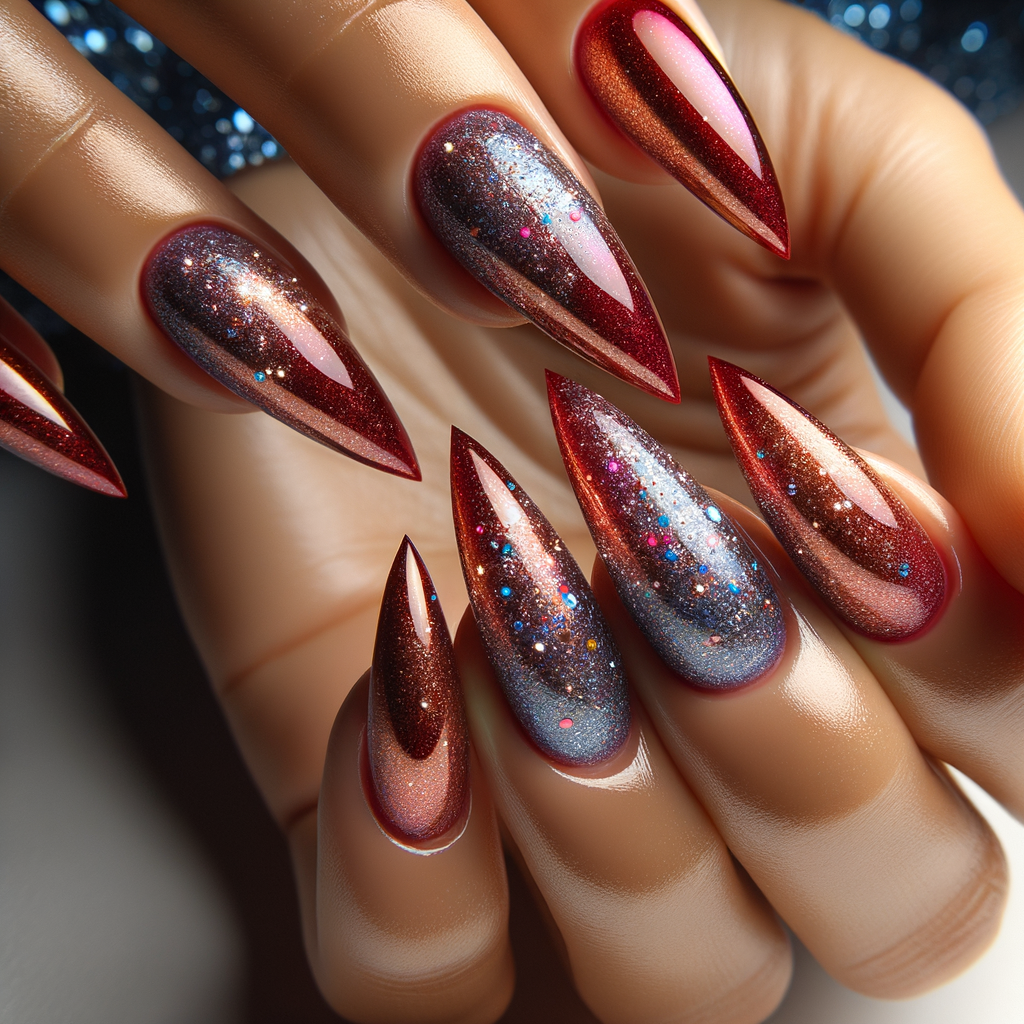
The Sparkly Claws manicure conjures up visions of a glamorous vampiress with its dark crimson base and shimmering gemstone accents.
This look requires precise application to achieve sharpened stiletto tips.
Begin with natural well-groomed nails filed into long almond shapes, rounding out the tips slightly.
Apply a layer of clear acrylic liquid to just the free edge of each nail.
Dip a small detailing brush into dark red acrylic powder and dot it onto the liquid covered tips, slowly building them up into ultra-sharp pointed claws.
Gently file into smooth tapered spikes.
Paint the claws and lower nails with two thin coats of blood red creme polish, allowing it to dry completely.
For the vampiric glam factor, apply a third shimmering coat packed with red-toned microglitter.
Using a dotting tool dipped in black polish, add tiny gemstone accents randomly along the free edge and lower nails to resemble precious jewels or onyx stones.
Finish with a glossy topcoat to intensify the shimmer.
Your new talons will be the envy of all night crawlers!
Viewed as both lethal yet stunning, these nails demand the same adoration.
Be sure to flash your sparkling claws whenever asserting your nocturnal dominance is needed!
Orange Creamsicle – A pop of creamy Dreamcicle orange on round short nails
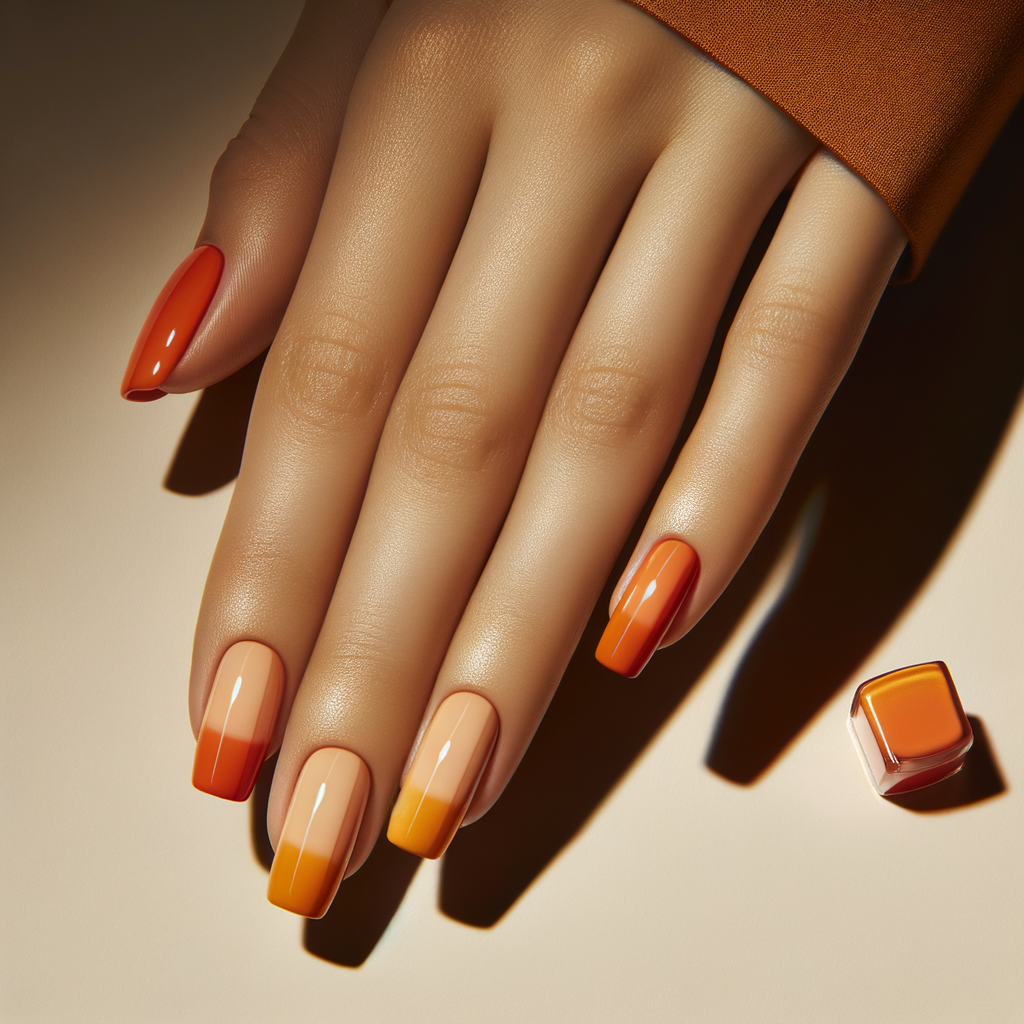
The Orange Creamsicle manicure injects a sheer citrus twist perfect for summer.
This simple look charms with its popsicle-inspired hue painted across short, pearly nails.
Start with oval nails filed into smooth, rounded shapes of medium length.
Apply a thin layer of white creme polish and allow to dry completely for a milky base.
Next, apply two coats of a true tangerine creme, allowing even coats to dry fully between.
The creamy orange shade should be vibrant yet subtle against the white base.
For an extra sweet finish, brush on a quick drying gloss topcoat.
As it dries, lightly dust white pearlescent micro-glitter onto each nail with a small brush.
Tap off excess.
The sprinkling of pearls mimics soft-serve swirls or creamy condensation beading on an iced treat.
Cute mini orange slices or a witty phrase could also be added for fun.
Admire how your fresh manicure transports you to simpler summer days spent enjoying life’s little pleasures.
Wear these nails while relaxing poolside or enjoying an actual Creamsicle popsicle – the vibrancy is sure to brighten everyone’s day!
Dagger Tips – Pointed stiletto nails perfect for subtle threats and secretly scratching enemies
The Dagger Tips manicure channels your inner femme fatale with sharp stiletto nails ready to slash.
Achieving the pointed tip look requires patience but results in claws that command intimidating yet magnetic appeal.
Begin with almond shaped natural nails file to smooth tapered points.
Apply a layer of clear acrylic liquid to just the free edge of each nail.
Dip a small detailing brush into black acrylic powder and dot it sparingly onto wet tips.
Slowly build up each nail into an elongated sharp spike, tapering the ends to wicked pinpricks.
Gently file into smooth slender daggers, rounding out the very tip just slightly to avoid stabs!
For an inky finish, paint two coats of glossy dark gray crème polish on tips and lower nails.
Add spikes to your personality by gluing on faux silver studs, rhinestones or tiny spike decals along the free edge using nail glue for a dangerous edge.
Apply a glossy topcoat to complete the look.
Your fingertips now delicately disguise weapons meant to intimidate yet allure!
Flaunt these stiletto claws with skintight leather—just be careful not to graze flesh, unless intended!
Dagger Tips are sure to draw involuntary stares.
Leopard Print – A sexy animal print in taupe and black brushstrokes for nails with attitude
The
Leopard Print
manicure injects a hint of sexy wildness with its signature spotted motif.
Recreating the look requires steady brushstrokes but results in nails that attract attention.
Begin with almond shaped nails filed into smooth ovals, neither too long nor short.
Apply a base coat of taupe or gray creme polish and allow to fully dry.
Take a small dotting tool or detail brush and dip the tip into a glossy dark brown nail polish.
Starting at the cuticle, gently dab and drag dots in horizontal rows down each nail, leaving space between for spots.
Switch to a lighter tan polish and apply smaller scattered dots in and around the dark spots.
For a truly feral appearance, add sporadic strokes of tiny black dots wherever open spaces remain.
Review your work – the haphazard placement of different sized circles in contrasting shades should resemble the signature coat of a leopard.
Go back and fill any sparse areas.
Once spots are fully dry, lightly dust pearl pigment or small hex cut rhinestones in matching shades randomly over nails to add iridescence like luminescent furs.
Seal designs with a fast drying topcoat to lock in your wild new mani.
Feel your inner prowler emerge as curious eyes admire your stealthy spots from a distance!
Neon Camouflage – Highlighter bright camo colors splashed across the nails in an eye-catching pattern
The Neon Camouflage manicure amps up traditional army prints with an electrified edge.
Achieving the look requires patience but results in nails that mesmerize.
Start with short almond shaped nails filed smooth.
Apply two thin coats of jet black creme polish as the canvas base, allowing each coat to fully dry.
Using a detail brush and neon pink polish, dot thin random shapes and lines to resemble leaves and vines scattered across nails.
Switch to neon yellow and repeat the process, crossing colors freely.
For extra dimension, outline certain leaves in neon green.
Leave portions of the black peeking through for contrast.
Wet brush between colors to keep from bleeding together.
Once base design is complete, add subtle touches of fluorescent orange dots here and there for random effect.
Step back periodically to ensure relatively even coverage.
Once fully dry, brush a layer of clear matte topcoat to mimic a dull finish.
Tap a makeup sponge into fine iridescent glitter and lightly pat random nail areas for extra shine.
Admire how your nails camouflage yet attract attention through electrified colors.
These mani’s futuristic patterns may confuse and disorient enemies into retreat!
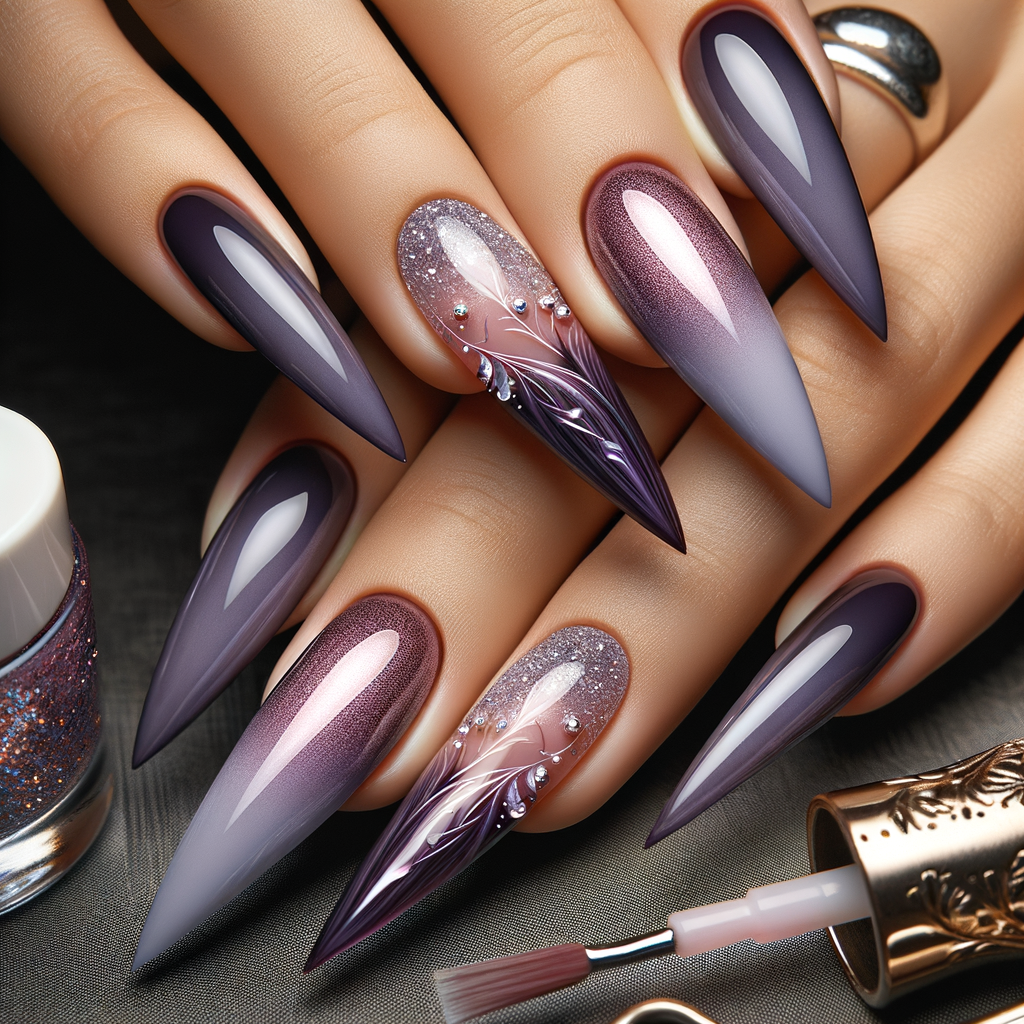
Glitter Ombré – A dark to light ombré gradient of multicolored sparkles on coffin nails
The Glitter Ombré manicure adds subtle shimmer to natural nails using a gradient of micro-glitter.
Achieving the blended effect takes patience but transforms hands into mesmerizing canvases.
Begin with short almond shaped nails buffed to a smooth finish.
Apply a thin coat of clear base polish and allow to fully dry.
Using a detail brush, carefully dot tiny amounts of fine silver glitter near the cuticle on each nail.
Continue brushing glitter outwards in an oval shape, leaving the tip area bare.
Smooth edges with a clean brush before glitter dries to obtain a blended gradient.
Add more sparkle where desired by patting dots with an emery board.
Repeat process on remaining nails using 2-3 different colored glitters (gold, rose gold, etc.
), blending each subtly into one another.
Seal entire design with a glossy fast-drying top coat.
Adore how light dances across your flawless ombré mani!
Subtle sparkle like this flatters any ensemble with mesmerizing finesse.
Illuminate board rooms, parties or everyday moments with your shimmering fingers!
Black Flames – Flames and fire licking up crimson red and orange tips against a black base
The Black Flames manicure conjures edgy intrigue through illusion with its shadowy fire motif.
Mastering the look requires patience but results in nails that mesmerize.
Start with short, rounded oval nails filed to smooth shapes.
Paint entire nail bed in two thin coats ofjet black creme polish, allowing full drying time.
Once dry, dip an ultra-fine liner brush into orange nail paint.
With a steady hand, outline one nail edge in thin lines resembling flames.
Continue outlining wavy lines that grow thicker as they progress toward center, overlapping slightly to resemble flickering fire.
Blend brushstrokes.
Repeat flame motifs randomly across remaining nails, keeping silhouettes unique for visual interest.
For extra drama, accent some tips with tiny yellow or red touches.
Be sure black base fully dries before applying gloss topcoat to preserve delicate liner work.
Admire how your flames cunningly flicker in the dark!
Whether wearing these nails to ignite passion or sizzle with cool energy, you’ll leave audiences spellbound by the smoldering intrigue of your Black Flames.
Double Trouble – Each nail painted in two contrasting colors split down the middle
Start with short, rounded nails in a crisp white or nude shade for maximum contrast.
Make sure they are smooth and buffed.
Map out simple shapes on one half of each nail using a small dotting tool dipped in black polish.
Good options are triangles, circles, squares, dots in a pattern.
Let this side dry fully.
For the mirrored side, carefully trace the exact same shape flipped over to the opposite half of the nail.
Use a liner brush for precise edges.
Vary the mirrored designs on each nail so no pair is identical.
Mix up different geometric shapes and patterns to keep it interesting.
Once the main mirrored shapes are drawn, go back and fill any blank spaces with additional small polka dots, curved lines or plus signs for continuity.
Apply a glossy topcoat once fully dry to make the black mirror images really pop against the background color.
The shine also protects the artwork.
Display your playful nails at their best under direct light where the symmetric dupes can really be appreciated.
Channel double the charm and humor by rocking this mani.
See it as tapping into your limitless potential through clever doubles!
The key is taking your time to map out perfectly mirrored shapes on each nail.
With patience, you’ll achieve fun Double Trouble talons to turn heads.
Studded Kiss – Kissable round tips coated in small clear studs glued on randomly
The Studded Kiss manicure exudes badass intensity through faux metal accents.
Achieving the edgy look requires precise application:
Start with medium-length almond shaped nails filed into smooth ovals.
Apply two coats of vampy burgundy creme polish, allowing full drying between.
Once dry, outline lips of varying shapes onto each nail – some wide & sultry, others small & coy.
Use a detailed brush and jet black polish.
For dimension, dab a small amount of red glitter polish onto lip centers before sealing outlines.
This adds the impression of blushed hue within.
Let lips fully dry before applying rhinestones.
Use a pick-up tool or dotting tool to carefully place faux silver studs or tiny round glitter accents along lip contours and surrounding nail areas.
For extra edge, add isolated studs or place some lips with a single centered stone sparkling through glossy sheen.
Finish by brushing on a fast drying gloss topcoat to amplify shine and seal embellishments in place.
Your nails scream seduction through subtly rebellious beauty.
Through creativity and patience,
nail art
opens up an exciting world of self-expression.
Whether opting for understated elegance or bold statement pieces, the choice of design reflects one’s unique style and mood.
Mastering core techniques allows you to become the artist, putting your own spin on trends or pioneering looks all your own.
More than decoration, customized nails build confidence from within.
They spark joy and empowerment in their wearer through visual flair that attracts smiles and admiration.
While designs may evolve daily, nails remain small canvases to share upbeat vibrancy or intimate vulnerabilities.
For anyone feeling inspired to experiment, remember – it’s about the journey, not the destination.
Imperfection is part of the process, so enjoy loose experimentation.
With steady practice, your skills will grow exponentially to craft whatever speaks to your soul.
Stay open to learning from mistakes as guides to greater mastery ahead.
Most of all, embrace individuality through creative outlets that bring you inner peace.
Nail art is a chance to thoughtfully stylize fingertips – windows to the authentic you.
May your talents blossom freely as beautiful works of resilient self-love.